Upcycled dresser to Furbaby Stairs!

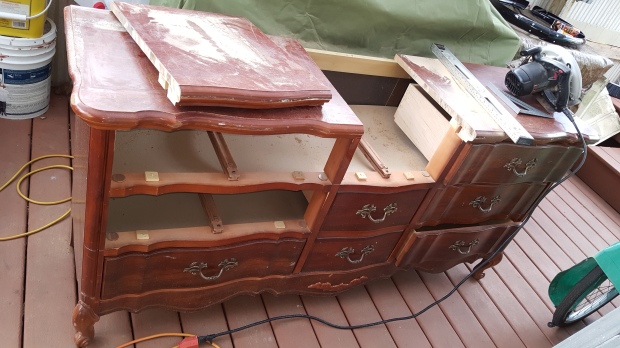
Is your Furbaby aging? Do we have arthritis? Do you have a small Furbaby that has a problem getting into that tall bed?
The reason I made them myself is that most the pet steps online and in stores had complaints about them not being sturdy enough and the price was outrageous.

The bonus of upcycling is to save the treasures from the dump, and unclog the earth from trash.

Disassembling the dresser took little time to figure out. But with some power tools and some by hand we got it all figured out rather quickly!

Tools and equipment
Circular saw
Air gun and staple gun
Japanese saw
Staples and nails
Pencil and marker
Glue (not necessary)
Tape measure
Sander and sand paper
Level
Goggles protect those eyes!!
Drill and driver heads
Extension cord
Air compressor
Screw driver
Hammer
Rubber mallet
Table saw with 80 tooth blade (The more teeth, the cleaner the cut)

·      2016-03-17 15.19.43   Cut the top carefully in a straight line. You will be reusing it. With the circular saw, make sure your depth is correct just to cut the top, not to cut too low in the existing supports. I drew a line with the level, to use it as a guide to stay straight.

·

2016-03-17 15.20.10

cut the top with a circular saw

Remove the top and set aside.

·

Next we will be cutting the supports or legs off of the drawers we removed. Cut as close as you can with the circular saw. And the rest of the way with the Japanese saw, not to be perfect will be sanding flush and smooth later.

·

2016-03-17 19.10.44-1

pry off drawer stops and guides

Remove the drawer stops, pads and slides with a pry bar or my handy dandy flathead screw driver and a hammer LMAO.

·          Dismantle two drawers carefully with a rubber mallet. We will reuse the bottom of it for the sides of the stairs that is open.

·         In the back measure and cut legs for the risers. I only need two legs. One for the second and third step.

·

2016-03-19 13.45.17

dry fit the cut out tops to get measusrements for side panels

Dry fit the tops. And get a measurement from the top of the step to the top of the next rise, and from the front to the back. Cut the drawer bottom just a little larger (you will be sanding flush).

·         Dry fit everything once again just to make sure it all fits and works properly.

·         First I fit the first step top in place. I used the air gun and nailed it securely.

·         Next nailed the second step top in place.

·         I nailed the back legs in next, right into the side of the top step for both steps. To keep them from moving around.

·

Using air compressor and the staple gun. Stapled in the sides on both steps. Once set, I then sanded flush and smooth!

All done and ready to use until we get some paint to finish it up!!


Eyelid scrub wipes

2015-10-19 14.02.17Directions:

  • 15 drops Tea Tree oil
  • ¼ cup baby shampoo
  • 1 cup boiled water

Boil water and let cool to room temperature. Mix all together in a bowl. I use paper towel cut to size. And fold or stack towels in an old wet wipe container. Poor mix evenly over the towels till moist. Store in a cool place, preferably in a dark container.

Use daily for eyelid wipes.

  1. Eyelid Scrubs with Q-tips (cotton swabs). It is highly recommended that ocular rosacea sufferers apply eyelid scrub solution onto a Q-tip and gently cleanse their upper and lower eyelids.Q-tips are recommended because they aid in removing crust and debris from the eyelid. The eyelid skin is very delicate, so close the eyes and use gentle side-to-side strokes across the eyelid margins and lashes, being careful not to rub harshly or irritate the skin.
  2. Patients should cleanse each eye for 30 to 60 seconds.
  3. Lather from the eyelid scrub should then be rinsed off or removed gently with a tissue.

This method is also effective for removing eye make-up and mascara.

Notes:

Tea Tree Oil has been used as an antiseptic, anti-bacterial, anti-fungal, and as an analgesic for sore muscles. It is still one of the most popular essential oils today. As well as its many medicinal benefits.

Cleaning agent: “no more tears” baby shampoo that is safe to use on a newborn baby.

Remember, you should always do what is recommended by your eye care professional. There are many options for eyelid scrubs but your doctor will recommend the method that fits your condition and needs the best.

Foam spray

image

foam spray


Have you ever used that foam spray in a can from the hardware store.? I have thrown so many out half full, seems liked such a waste.  It has many uses besides filling the walls for leaks.  This time we used it to reinforce the threshold of the front door.  We put a couple drill holds on the metal base plate,  got pressure release, using a1/4 inch drill bit.  Then just spray a little foam in there.
Now comes the dilemma of cleaning the can and the sprayer up.
Things you will need:
Paper towels
Wooden skewers
A small dish or bowl (not plastic)


2014-07-20 14.22.50

Slowly with a paper towel screw of the  sprayer nozzle . It comes off easy.

 Next separate the long shaft from the nozzle.


2014-07-20 14.23.34

Now soak it in the nail polish solution for a couple minutes.  Now take your wooden skewer and slowly put inside the nozzle. and pick out and foam that is in there. put back in nail polish remover to soak a little more.

2014-07-20 14.24.32

Again scrape out any foam left inside the sprayer nozzle. This may take a couple tries to get it all out. May even take a several minutes of soaking to remove all that sticky foam!

2014-07-20 14.21.35


Now I found a small enough metal rod to put inside the threaded part of the spray can. And slowly as wellas BE CAREFUL!!! not to puncture the can. Only go in as far as the white top nozzle insert with the rod after dipping in acetone, and work out the foam in there.


foam spray nozzel

foam spray nozzel


And for the last part the long shaft. Using you skewer after dipping in acetone. Completely insert it all the way threw several times until all the foam is removed. Pretty simple, and frugal!!

Make your own lid for kitchen aid mixer!

Being a frugal grandma (or cheap skate as my family says lol) I figured a way to create a lid for our mixer.

I hate it when the flour (or any dry goods) poofs up a big dust cloud and dirties the entire counter. GRRRR Welcome to my O.C.D. side!!!

After scouring the internet, for ideas. I came to this simple but useful lid.

Just so happens that our local Meijer’s sells plastic ice cream containers in gallon and 1 quart size. Which turns out fits my kitchen aid mixer bowl perfectly.

Next step is to measure the for the hole size. The circular part where you put your attachments on. Mine is silver.

Next I found a round can about the same size that I needed and traced the circle around it with marker.

Now cut the hole out carefully. As you can see im not that good at cutting… hahaha.

Less mess on My COUNTERS!!!

Make your own hanging easter eggs!


As my children get older, I find a lot of the decorations they have out grown. So this week I am going to show you how to hang old and used plastic Easter Eggs on a tree, shrub or where ever your heart desires!

You’ll need a few supplies and tools.

Plastic Easter eggs.

A drill

Very small drill bit (I used 1/16 size)

Piece of scrap wood (for drilling holes not your Desk top! Lol)

I used Christmas hooks (I buy after the holiday for dirt cheap) but you can use fishing line, twisty bread ties, or whatever you can come up with.

A pencil for bending the wire.

Directions:


Open the eggs, clean if necessary.


Place one part of the egg on top of the scrap wood, and drill a hole near the center, doesn’t have to be perfect.


Straiten one part of the wire and insert it threw the hole, the other end you will wrap around a pencil ( so it does not slip through the hole).


This is an updated one with 2 holes. Not sure which one I like better but they both work just fine!


As you can see its with and without snow Damn Michigan weather


I’m excited to announce our latest Insiders Promotion – NEW Purex® Fresh Pet detergent for Pet Clothing!

fresh_pet_PromoThumb


He sleeps like a king now

He sleeps like a king now


www.purex.com/purex-fresh-pet-detergent-for-pet-clothing


*Purex provided me with a sample of Purex Fresh Pet detergent for Pet Clothing in exchange for a product review. However, all the opinions expressed here are my own.”

Making homemade relish and canning

Here is what you need to make Sweet Relish:

  • 2 Tablespoons of vinegar
  • 2 qts cucumbers (Skinned and chopped to size of French fries)
  • 2 tablespoon salt
  • 1 qt onions– chopped
  • 3 green bell peppers-chopped
  • 3 red bell peppers-chopped
  • 1 large can pimento
Before you begin, be sure to have all the canning tools you’ll need ready. You will need a jar funnel, jar tongs, clean jars, lids and bands, a ladle, colander and several cooking pots.

Rinse or soak (store bought has wax coating) all vegetables, (depends if you grew them organic or store bought) if your soaking about 2 tablespoons of vinegar to a sink, let sit for about 15 mins. Peel and chop ends off the cucumbers and compost ends.


After removing end or bad parts. I had to cut them to a size to fit in the vegetable cutter.

I use a nifty French fry cutter to slice my cucumbers and onion into thin strips. You could do it by hand, or with a mandolin, I did before takes a long time! I was doing a lot of chopping and slicing and dicing and so I bought this and use it practically every day!

I forgot to take pictures of the onion cutting, peel cut off ends, cut in half, place the cut side in the side of the cutter-so the rounded side touches the blade(CAREFULL not to cut yourself, I have its not pretty lol)It will dice and cut them at the same time..

Dice up thestrips  with a large knife, then drop them into a large bowl, big enough to hold all the chopped cukes, peppers and onions. Put aside and start chopping the other stuff.

Cut off the tops of the peppers. Remove the stem from the top you just cut off. Slice into strips. And then dice them up.

Don’t forget to throw them stems in your composter.

Toss to mix well, add 2 tablespoons of salt and cover in water., then stir, cover and refrigerate; let stand at least 6 hours or overnight, stirring occasionally, if possible.

Drain well, stirring occasionally to release as much liquid as possible, but do not rinse.

INGREDIENTS: For the Syrup:

Last

  • 1 quart of white or cider vinegar
  • 1/4 teaspoon of red pepper flakes, or to taste, optional.
  • 4 cups of granulated sugar
  •  
  • 2 teaspoons of finely minced garlic
  •  
  • 2 tablespoons of mustard seed
  •  
  • 2 tablespoons of celery seed
  •  
  • 1/2 teaspoon of turmeric
Directions:
  1. In a large pot, mix together the vinegar (white or cider), sugar, garlic, mustard seed, celery seed, and turmeric.
  1. Bring to a boil, stirring regularly until sugar is dissolved.
  1. Add in the drained vegetables and red pepper flakes, if using, return to a boil, reduce to medium and simmer for 30 minutes.
  1. Use a slotted spoon to transfer relish into sterilized jars, leaving head space and top off with syrup, wipe rim of jar clean, then tighten band over to seal.
  1. Seal, refrigerate, or process for canning.
If using standard canning practices process for 15 minutes in a boiling-water canner.
Canning Directions:
  1. Using the jar tongs, lift jar and put into the hot water canner. Cover with lid and boil for 15 minutes.
  1. When 10 minutes are up, carefully remove lid, then use jar tongs to lift each jar, wipe to dry and clean , place them in a area where they can cool overnight.
  1. Cover jars with a towel to prevent them from cooling too fast.
  1. In the morning, press the top of each jar and make sure the vacuum seal worked.
  1. If the lid pops up and down, boil again in the hot water canner for another 10 minutes, or put in the fridge and eat it up!
The relish tastes great on hot dogs, mixed into tuna fish sandwiches, potato salads… whatever you can image.

My faith in humanity

On Saturday we decided to go to microcenter in Madison Heights. We have been pricing TV mounts for our bathroom TV. They had the best price for the features I wanted, 15˚ degree tilt with pull out arm.

We then treated ourselves to dinner at bob Evans. MMMmmmm good.

On the way home, in a snow storm on the I75 freeway we hit a pothole! And got a flat. So needless to say changing a tire on the freeway in snow SUCKED!!!! As a couple hundred cars passed us. Two JERKS even honked to get off the road, I flipped them off, they may not have seen it but it made me feel better. 🙂 Got the donut tire on and finally a good Samaritan stopped to help us. Restored our faith in humanity…

Home safe and sound.. Thank god!!

We did get a new tire for 38$ glad we opted for tire replacement plan!!

So my next adventure to hang the TV,~~~ WISH me Luck!!TV mount

Just another Friday

Just another Friday

Today happens to be Nation sleep outside. And in Michigan it is 6˚F so I’m thinking um not this time lol. Not going to freeze off my butt, but I could stand to lose a few pounds.

This winter has been abnormally ruff on all of Michigan I believe. I am in cabin fever mode! And I will not stop, even our dogs have it. It has been too cold to take them out for a run. And Jack Russell’s don’t understand that.

So my head wandering about a million miles an hour, on Pinterest, on what I can made to keep my brain busy, so I don’t bug the family. Lol they will appreciate me more if I don’t bug them. Even though the hubby says he hates that site it costs him money. He secretly likes it so I don’t remember about his honey-do-list…LMAO

Yesterday I made shelves for the front room. Specifically above the TV to hold our sound speaker, and some piggy’s!Image

WE have a local Aco selling inventory out.. So of course my CHEAP butt is going there. Found a few items I need to complete some future project’s, wheel’s for bathroom doors, push close for axolotl tank doors, shelf brackets, all 60 % off.. GO frugal grandma.

Onion cutting the fast way!

We received 3 bags of onions. And I hate to waste anything. As my grandparents used to say “Waste not Want not”.

So I needed to dice up 3 bags by hand. Um NOT gonna happen. So I began to read on line of easy ways to do it. And all were cut by hand. Pfft.

2014-02-16 11.24.24

open bagged onion

I did see some pictures of machines that do cut them, but most were restaurant ones, needless to say expensive. I did see a photo of my potato cutter. So with alittle more research my quest was complete.

Learning to do things outside the box I’m learning as I age.

Today I have found a new use for our potatoes slicer, It also dices onions.

2014-02-16 11.40.02

Vegetable slicer! A.k.a Potato slicer.

2014-02-16 11.24.15

So I started by removing the outer skins and composting them.


Cuttin off the top and bottom

Slicing off the tops, bottoms

skinning onion

Removing the brown paper like skin

Next cut the top and bottoms off, and remove the paper like brown skin.

Remember to compost those to!

Clean cut onion

Nice and clean Onion

Starting to dice

The start of dicing them onions up

Now don’t they look pretty, too bad they don’t smell pretty!

 Make sure to put them flat side up, not on the rounded side. This makes a difference between dicing and slicing the onion. As usual I learned the hard way on this experiment!

Before cutting the onion, I pulled out my silicone mat for baking.

2014-02-16 11.42.15

Perfectly diced onion

2014-02-16 11.43.07

Wont slide on counter

Turns out its great on the counter for quick mess clean up, and also keeps a grip on the counter, but you don’t want  sharp objects to make contact on it. Plus you can fill it up and roll it, and slide the items right to where you want them. Like on a cookie sheet for freezing! 

So next I have to find room in my freezer for them..Send me luck Ill need it!

full freezer

Our deep freezer

Many thanks for reading this!